


Search
-
HVAC Equipment
-
Ductless Mini Splits
- Ductless Mini Splits
- Shop By Zone
- Shop by BTU
- Shop By Brand
- Components
- Accessories
-
HVAC Parts & Supplies
- HVAC Parts & Supplies
- HVAC Supplies
- HVAC Tools
-
HVAC Replacement Parts
- Blower Housing & Assemblies
- Blower Wheels
- Breakers, Contactors & Disconnects
- Capacitors & Transformers
- Control & Circuit Boards
- Filter Driers & Accumulators
- Gas Valves & Conversion Kits
- Heat Exchangers
- Thermal Expansion Valves (TXV)
- Temperature Controls
- Wall Brackets & Parts
- Miscellaneous Parts
- O-Rings & Gaskets
- Hydronics
- Motors
- Thermostats & Zoning
-
Plumbing
-
Pool
-
Electrical
-
Air Quality
-
Tools & Supplies
-
Door Security & Hardware


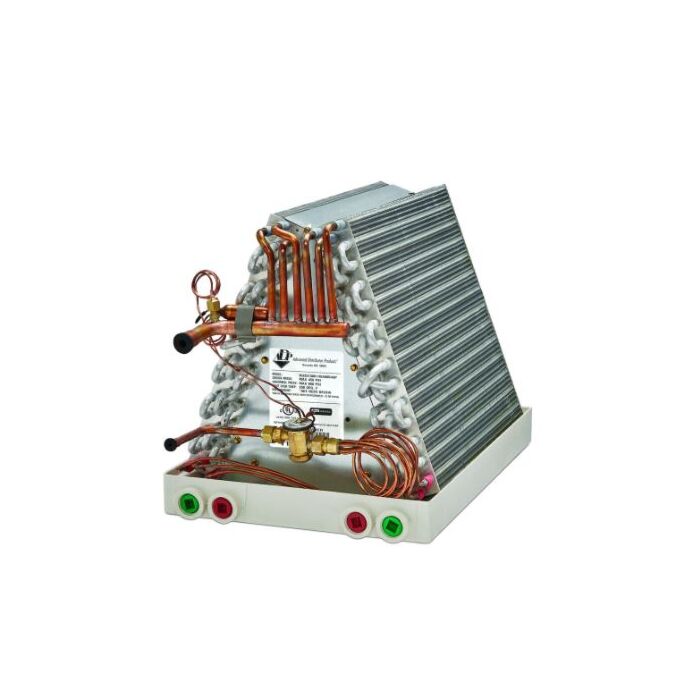
Adp hg33a36a155a0004n Uncased A-coil 15.5in Lh R-454B Txv

Availability:
Out Of Stock
- $657.77
- $657.77
- Unit price
- / per
✓
Better Price in Cart
Manufacturer pricing rules prevent us from advertising our discount — no account or email required to see it.
LTL Delivery
This product weighs 75 lb each and will be shipped via LTL carrier. A lift gate option will be added free of charge for your convenience.
-
Secure Payments
-
Easy Returns
-
Expert Advice
-
Fast Shipping
Product Description
The ADVANCED DISTRIBUTOR PRODUCTS hg33a36a155a0004n is an uncased evaporator A-coil designed for residential and light-commercial split-system air conditioning and heat pump applications. It ships in a left-hand orientation and measures 15.5 inches in width and 17 inches in height, fitting standard air handler and furnace cabinet openings in that dimensional class. The coil uses a factory-installed TXV metering device matched to the R-454B refrigerant circuit, providing accurate refrigerant flow control across the operating range. Licensed HVAC technicians performing refrigerant-side work install this component during system commissioning or evaporator coil replacement.
This coil is rated for multi-position installation, supporting upflow, downflow, and horizontal configurations depending on the cabinet and drain pan arrangement. According to supplied product data, it is compatible with Allied 1.5-ton and 2-ton 7AC series units. Its uncased design integrates directly into an existing air handler or furnace cabinet, making it suitable for retrofit applications where the original coil must be replaced without swapping the full cabinet assembly. Installation in the correct left-hand orientation is required to align drain connections and airflow paths properly.
Key Features
- Factory-installed TXV metering device matched for R-454B refrigerant systems
- Left-hand orientation with multi-position configuration support
- 15.5-inch B-width fits standard residential split-system cabinet openings in that size class
- 17-inch height accommodates typical furnace and air handler coil compartments
- Uncased design for direct drop-in replacement within an existing cabinet
Compatibility
Compatible with Allied 1.5-ton and 2-ton 7AC series units as stated in the product data. Designed as an OEM-style uncased A-coil replacement for R-454B split-system applications in the 1.5- to 2-ton capacity range.
Installation Notes
Installation must be performed by an EPA Section 608 certified HVAC technician due to the refrigerant circuit work involved. Disconnect and lock out all electrical power and close refrigerant service valves before removing the existing coil. Verify drain pan alignment and condensate routing after seating the coil in the cabinet, and confirm the TXV sensing bulb is properly secured to the suction line before pressurizing the system. Follow local mechanical codes and the equipment manufacturer's installation instructions for brazing procedures and leak testing requirements.
Technical Specifications

Vendor: ADVANCED DISTRIBUTOR PRODUCTS
Adp hg33a36a155a0004n Uncased A-coil 15.5in Lh R-454B Txv
$657.77
Vendor: ADVANCED DISTRIBUTOR PRODUCTS
Adp hg33a36a155a0004n Uncased A-coil 15.5in Lh R-454B Txv
$657.77
Complete your install
We pulled together the parts most installs need for this unit, plus a few add-ons worth a look. Check what you need — nothing here blocks checkout.
Loading install accessories...
Add install kit to cart
—
Related Products
- Choosing a selection results in a full page refresh.